With the first day of school right around the corner teachers are looking for fun activities for their students! If you teach Math you will love these activities!
These clever ideas for organizing math stations are going to help keep your classroom tidy all year long! Each tip is clickable and will lead you to more details about organizing the math stations.
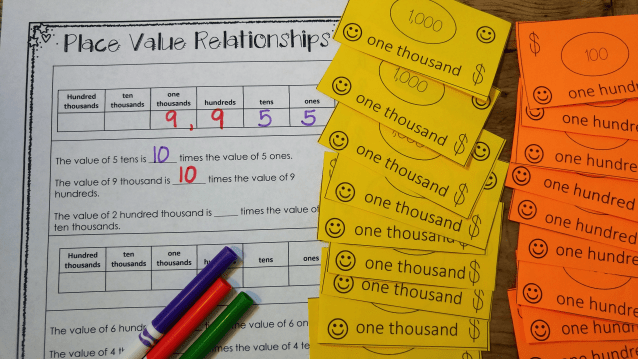
I am not sure when I learned how to write numbers in expanded notation, but I am certain it was not in 3rd grade. Students now are expected to learn how to write numbers in expanded notation as early as 3rd grade here in Texas and I am sure that applies to other states as well. But why? It is part of a push to help students understand the relationships between places and digits in our base ten number system. It can seem difficult at times, but with hands on activities and a lot of practice, your students can master expanded notation.
One method I find to be very effective is using play money:
Give your students a number. Guide them to use their play value money to model the number.
Then ask them “Ask “How many hundred thousands?” Tell “Expanded notation shows the number in each place times the value of the place, so 3 hundred thousands is 3 x 100,000.”
Continue questioning and guiding students to use play money to help them write the numbers.
You can download my play money for FREE by clicking the picture above.
For more great place value ideas, check out my Place Value Board on Pinterest!
I like place value blocks. They are a great concrete model for helping students to understand the relationship between ones, tens, hundreds and thousands. Students can count the blocks and set them side by side to see that ten ones is the same as one hundred or that one hundred tens is equal to one thousand. I also think it is important to use other examples for students to find meaning in the base ten system. In early grades we see students bundling straws and or popsicle sticks to learn grouping in tens and hundreds. A lot of teachers have students bring in objects to count on the hundredth day of school and sort them into groups of ten to see the relationship between ones, tens, and hundreds. These are terrific! But … what about older students? What about the relationships in the thousands, millions, billions?
For years I used blocks to teach and review base ten from ones through one thousands and then showed the students the patterns on the place value chart. One year I borrowed thousands cubes from other teachers to show my students a concrete example of ten thousand. (It was tall). This is a great concrete example for a lot of the students, and I still use the blocks (see my blocks post here). But not for all. So, what other models can we use with older students?
Money! Yup! Students seem to like talking about and playing with money! So I started using that play money from my manipulatives kit to help students see that the relationship between place values isn’t always about size, sometimes it is about WORTH (value)! So I took the fives out and we would use the play money to practice trading 10 ones for a ten, 10 tens for a hundred. And then I showed how that pattern repeats on the place value chart. Works great! But … most sets of play money don’t have the bigger bills … so … I made my own play money!
Now I have bills from the ones to the millions! I had a student ask me last week when we were working on this if there was really such a thing as a ten thousand dollar bill. I told her I wasn’t sure, but maybe we could research money to see what kind of bills the US Mint makes! Maybe I will have time to do that tomorrow! 😊
There are many ways to teach problem solving to elementary students. Most students are successful with a well structured problem solving plan. However, we all have at least a few students who just don’t “get it” with regular classroom lessons. Working one on one or in small groups and applying well planned interventions helps these students find success. Last week I shared my first three top tips and today I am sharing the next three tips:
Some students understand the questions just fine, but have trouble seeing the big picture, the story or the scenario. These students need extra help laying out the details. Most students will benefit from instruction in drawing pictures or making diagrams, and struggling students will especially need to practice with this.I like to teach my students how to make part-part-whole and whole-part-part models.
We will discuss each clue and label it as a part or the whole and then work from there.Strip diagrams and unit bars work well too.I also like to encourage students to make actual pictures of the clues. I am no artist and the kids like to laugh at my drawings with me!
This is so important for students who have trouble visualizing the actions in the problem. An example could be using this problem below with Martina and her purse.I will get play money out and we will actually act out the story with the play money. Another example could be to use colored counters with the apple story below.Now there are some big numbers so you could use smaller numbers to practice acting it out and then transfer the actions to your paper with the larger numbers.
Sometimes students get caught up by the big numbers and can’t focus on the actions in the problem. For these students you can cross out the big numbers, substitute with smaller numbers and have them solve. Then apply the actions to the bigger numbers. If needed, use manipulatives to help build understanding.
There are many ways to teach problem solving to elementary students. Most students are successful with a well structured problem solving plan.However, we all have at least a few students who just don’t “get it” with regular classroom lessons. Working one on one or in small groups and applying well planned interventions helps these students find success.
My favorite “Go To” intervention strategies are:
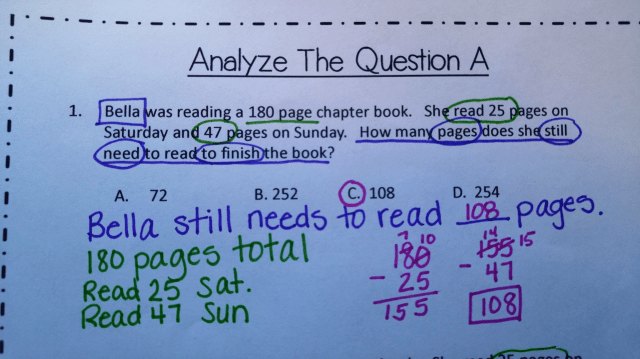
Often students read the problem and pick a method to solve without really addressing the question asked.I like to point out to my students which part of a problem is the question and which part is the “story” or “clues”. This helps students to see what part of the problem is telling and which part is asking.I like to use this analogy with my students: “I asked Shelley what color the sky is. She told me the grass is green. Did she lie? No, but did she answer my question? NO” and then relate this to word problems. If you use the clues, but you don’t answer the question, you haven’t solved the problem. One way to make this successful is to give your students a problem without the question, then have the students brainstorm as many different questions they can think of for clues.
Another way to help with this is to give your students 3 problems that share the same clues, but have different questions. This is a good way to show students that they need to analyze the question before they make up their mind about what steps to take. (Click the photo above for a FREE set of analyzing the question word problems).
This helps some students to understand the question better.Look at the example below. After reading the story problem, ask the students to rewrite the question as a sentence with a blank for the answer. Do this before discussing and strategies for solving the problem.The process of rewriting the question as a statement helps students to focus on what is being asked. After solving the problem, have your students place their answer in the blank and read the statement with the number in the blank. Teach them to ask themselves if their answer makes sense in the statement.
Most word problems follow a standard format with clues first and question last. Some students have trouble filtering the question out of the story. Students that have this problem can benefit from working from the bottom up. Teach them to read the question first (usually at the end) and then read the whole problem to gather clues. I usually save this strategy for students who really need that extra something after trying other interventions. It does not work for everyone, but for some it is the “magic trick” to help them organize the problem. Also, they usually need to do this until they get better at other strategies.
Geometry is one of my favorite units to teach! Maybe it is because I like to quilt so the patterns and shapes are fun for me! Maybe it is because there are so many hands on activities for my students! Some of my favorite activities for centers and/or workstations (math workshop) are:
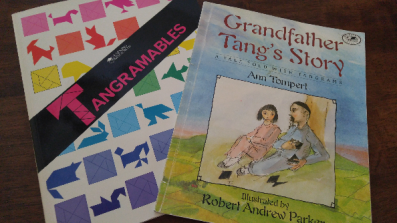
1.Tangrams:
I love to give my students tangrams and let them explore spatial relationships while building patterns and recreating patterns from books like “Grandfather Tang” and “Tangramables”. If you are lucky enough to have plastic sets of tangrams you can set them up in a center with the books and let your children explore with the shapes. If you need to make your own tangrams, you can download a free pattern here. Print on card stock and cut out. You can also find some cute cards for using tangrams here.
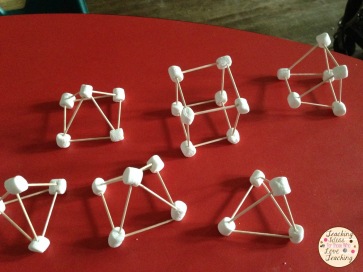
2.Make 3D Shapes:
Head over to Teaching Ideas For Those Who Love Teaching to See step by step how to make these awesome 3D Shapes with Marshmallows and Toothpicks! Yum!
Kids need to get out of their seat and move around! One of your best centers can be the scavenger hunt. Place questions around the room and give your students a record sheet to use while they work.For directions to make your own, see this post:Making A Scavenger Hunt.Or to use premade, print and go resources click here: Scavenger Hunt 1, or here Scavenger Hunt 2.
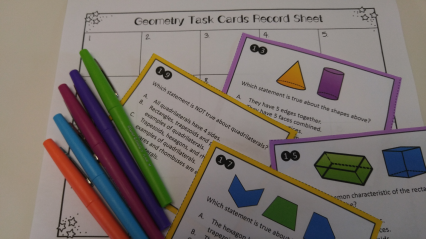
4. Task Cards:
These task cards are great for starting higher level discussions with your students.Students work together to answer questions identifying, comparing and analyzing critical attributes of 2 and 3 d shapes.
5. Technology:
Hopefully you have a few computers in your classroom you can use for a station. Here are two good websites for Geometry:
Do your students have trouble with elapsed time? It can be a tricky skill, but I have learned a few things that help my students to be successful!
1.) Read the problem once and then discuss or think about the story. Is it in order? What does the story tell you?
2.) Read the story a second time and think about SEE … S=Start time, E=Elapsed time, and E=End time. What does the story tell you and what does the question ask you?
3.) Make a number line that shows what you know.
4.) Use the number line to find what is missing. I use “mountains and hills”. The mountains are hours and the hills are minutes.
5.) For initial lessons, consider color coding. Try using green for start, red for end and any other color for elapsed. Eventually switch out to pencil, but refer back to the color coding for students who need that support.
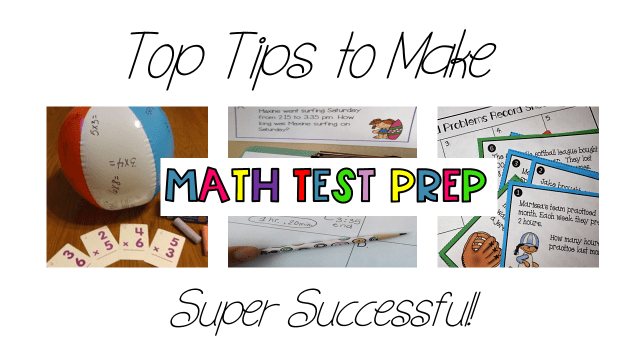
Seriously, how did it go so fast? Here we are almost to the end of the year, enjoying the Spring weather and looking forward to lazy days of Summer … BUT … we have to get through end of year testing first!
Here are a few tips to make test prep successful:
Tip 1:Prioritize areas of need – I don’t know where you are, but here in Texas we have SO MUCH to teach in a school year! When it comes time to review and get ready for testing it can be overwhelming trying to review it all! So take some time to sit down and reflect on what skills your students need to review the most. It is often different every year with each group of students. Spend extra time on the skills your students need the most.
Tip 2: Use student strengths to build confidence. So after you reflect on which key objectives and skills you need to review the most, spend some time reflecting on what your students are really good at! Review these skills (less than priority skills, but still review) to keep them fresh in your student’s minds and also to build confidence! If the students can see what they are good at, they will not be as stressed about what they still need to practice. I like to encourage my students by pointing out skills they found difficult at the beginning of the year and have now mastered! I say things like “Wow! Remember how hard ___ was at the beginning of the year and look how great you are with it now!” or “You have learned so much! You are so ready to ACE this on your test!.”
Tip 3: Make it fun!Realistically you can’t make every second of every day fun, but do what you can when you can. When students are having fun they are more engaged in learning! Play games, set up scavenger hunts, play music or decorate your classroom like the circus! Anything to keep your class from feeling so bogged down by the stress of “The Test”.
Tip 4: Smile!This might not sound like a test taking tip, but trust me on this one! When your students see you all super stressed out, they feel it! Smiling will help everyone relax! Maybe some yoga? Or a funny cat video on YouTube?
Tip 5: Add movement!Take some breaks to move around! If kids are in their seats too long they get sleepy and bored! Play multiplication games with a beach ball, take a walk around your hallway, do jumping jacks … have a 3 minute “dance party” as a break between lessons. You could even use a Math Song to dance to! I love this Eight Times Tables Song!